Sunday, July 14, 2013

Shrimp and Tofu Pad Thai


Hey everyone! I know its been a  like a month since my last post and I apologize it has been a crazy few weeks! First of all I had finals and then graduated!! Then about a week after I graduated by Brother-in-law got married and I helped my mother-in-law put that on. Then a week after that we went to Hawaii!! We got home about a week ago and I have been settling in to my new life :) It has been tons of fun! I am back now and back to a schedule and back to the blogging! 

Ok so at the end of June for one of my classes I had to throw a international dinner party. I went all out using my best china I got for my wedding a few years ago and decorated the tables and my awesome friend Lindsey took so beautiful photography for me! She did an amazing job, I was grateful to have her there because I had no time to take pictures with all the cooking an I wouldn't have even thought to do it! 

Over the next few days and weeks I will be sharing all six dishes and the drink I made. All Thai food so I hope you love Thai food because I do!! The first dish I want to share with you is Shrimp and Tofu Pad Thai. One of the best things about Pad Thai is how adaptable it is. You can change your meat, take out the tofu, or go meatless. It is all up to you!

P.S. for all of you that live in remote, tiny parts of the country and think you can't get these ingredients think about this: I live in Idaho and bought everything I needed at WinCo Foods!! If I can get it, so can you and sometimes you just have to make a substitution (easy pesy).  


Shrimp and Tofu Pad Thai

Recipe adapted from RasaMalaysia.com
Serves 4-6 people

Ingredients:

 Pad Thai Sauce:

4 tablespoons store-bought Pad Thai paste
2 teaspoons tamarind paste/concentrate ( I couldn't find this, so because Tamarind is a sweet and tangy flavor I used half brown sugar ad half lime juice There was still something missing, but I did the best I could)
3 tablespoons fish sauce
3 teaspoons sugar
2/3 cup water
1-2 teaspoons chili powder

Other Ingredients:

8 oz packaged Pad Thai noodles
3 tablespoons cooking oil
2 eggs
1 lb. peeled and deveined raw shrimp
1 tablespoon minced garlic
A small bunch of chives (cut lengths)
1 cup bean sprouts
1 lime, cut into 8 wedges
1/2 cup coarsely chopped unsalted roasted peanuts
2 blocks pan-fried Tofu

Method:

Soak the rice noodles in hot water for about 15 minutes or until they soften. Drain and set aside.

Combine the ingredients for the Pad Thai sauce in a bowl.

Heat up a wok and add oil. When the oil is very hot, add the minced garlic and do a few quick stirs. Add shrimp into the wok and stir until half cooked and then add the fried tofu pieces, noodles and Pad Thai sauce into the wok and stir continuously. Push the noodles to one side and crack the eggs into the wok, break it up by stirring and wait for 10-15 seconds, and then stir in the noodles. Add bean sprouts and chives into the wok, stir for 1 minute, dish out, sprinkle some peanuts on top and serve with a wedge (or two wedges) of lime. 

                                                                     Done!!

Here are more pictures of the final product! One of the greatest things about thai food is that they have (for the most part) very simple and quick cooking methods. Of course this is a trade off for having lots of different ingredients which gives Thai food its flavors. Thai food is known for having many flavors being brought together and harnessed in a beautiful way and maybe thats why I love it so much!  

                                                                Happy Eating!!!


Monday, July 1, 2013

Best Rice Pudding Ever!

Do you love rice pudding? Or better yet, do you HATE rice pudding? The this recipe is for you! Let me tell you, I never liked rice pudding. When I found out it was the hubs favorite desserts besides apple pie, I almost cried. It was a disgrace toCrème brûlée and all other amazing desserts! Well I took this class called Practical Homemaking (i know, i can here all you feminists cringing, but it is one of the finniest classes I have taken in my college career!) One portion of the class was cooking and we had a day were we talked about food storage foods. Back story: about 1 year ago I bought 25lb bag of rice from WinCo trying to save money and we still have it! (oh, that wasn't nearly as long of a story as I thought it would be. ha!) So I try to cook a lot of rice.

Like I said, the hubs loves rice pudding and for the last two years of our marriage the only way he got it was if he combined leftover rice, milk, sugar, and cinnamon...um gross. He basically was eating a sweet rice cereal, it doesn't sound as bad as it looked! Trust me, ok? So when we made this in my class, I tried it (for the hubs and because I have this thing where I always try the foods I make. I refuse to dislike something without trying. I know it’s ironic because I wouldn't try the hubs nasty rice cereal...thank you). So I tried it...and I LOVED IT!! So I had to make it for the hubs and I swear when I said the words "Hey, how about I make some rice pudding tonight?" He literally has this look that was somewhere between crying and unbelievable excitement...it was adorable! So after that huge story...here is the recipe for the amazing rice pudding!


RICE PUDDING


¾ c. uncooked white rice
2 c. milk, divided
1/3 c. white sugar
¼ t. salt
1 egg, beaten
2/3 c. raisins
1 T. butter
½ t. vanilla


In a medium saucepan, bring 1 ½ cups water to a boil. Add rice and stir. Reduce heat, cover and simmer for 20 minutes.

In another saucepan, combine 1 ½ cups cooked rice, 1 ½ cups milk, sugar and salt. Cook over medium heat until thick and creamy, 15 to 20 minutes. Stir in remaining ½ cup milk, beaten egg and raisins. Cook 2 minutes more, stirring constantly. Remove from heat, and stir in butter and vanilla. Serve warm.


HAPPY EATING!!
  

Pico de Gallo


As I promised I have the Pico de Gallo! I know I said I would post this a few days ago, but things have been crazy! I feel like my weekends are sometimes busier than the rest of my week. I threw this dinner party Saturday, it was basically my final for my International Foods class. We had to cost out, decorate and throw an international dinner for 6 people. I chose Thailand and it was so much fun! I will have recipes and pictures for you next week and I will go more into everything I did then! Anyway I spent most of Friday and Saturday prepping for that. I did most of the cooking myself! Like I said...crazy!


So Pico de Gallo....easy peasy (spelling? I don't think I've ever written that out before haha). Here is the most simple recipe you will ever encounter!


Pico de Gallo

Ingredients:

5 jalapenos-chopped
                    seeded or not. your choice. Seeded will make it less spicy, but where's the fun in that?
3 tomatoes-chopped
1/2 white onion-diced
1/4 bunch cilantro-chopped
1-2 cloves garlic-minced
garlic salt to taste
1 lime juiced
1-3 cubes of ice
                  depending on how big your cubes of ice are. The ice is the key to enhancing the flavors. It helps bring everything out and just taste amazing!


Alright..here's the hard part....

Directions:

Add all the ingredients to a bowl and stir. Let sit for 10-20 minutes in the refrigerator. 

 AND...done. Told you it was hard! (yes, there is heavy sarcasm there). Seriously easy and seriously amazing. Try this tonight!


HAPPY EATING!!


Thursday, June 27, 2013

Yummy Summer Salsa

So yesterday in my International Foods class we headed off to Mexico! I'm telling you we had some awesome food. I made the Salsas! It was so much fun and I have now acquired two new amazing salsa recipes! These salsas are super practical and you can make them super fast (depending on how fast you chop haha for me that means it takes a little longer).

 By the way neither of these salsas are very hot (for all you with tender palates out there)! I love love super hot salsa so to put this in perspective, my husband swears they are not that hot, and I promise he is kind of wimpy when it comes to spicy foods! However, if you are like me and can take the heat ;-) these salsas are super customizable and you can make them as hot as you want them!!

My beautiful creations!


So today I am going to give you the Avocado Chile Salsa recipe and tomorrow I will post the Pico de Gallo recipe!

Avocado Chile Salsa

Ingredients:

1 whole red onion--quartered and finely sliced
2 whole red chilies--seeded and sliced or diced
1 whole lime--zested and juiced
2 whole large avocados--halved and pitted
2 large tomatoes--seeded and diced
1 large handful of cilantro leaves
TT salt and ground black pepper

Directions:

1. Put the onion, chile, and half of the lime juice into a bowl and set aside to marinate for a few minutes.

2. Using a spoon, scoop out small balls of avocado into a serving bowl. Add the lime zest and remaining juice and turn gently to coat. This will help stop the avocado from browning.

3. Add the diced tomatoes to the onion mixture, toss gently, then add the avocado mixture. Tear the cilantro over the top and sprinkle with salt and black pepper.


See! Easy! Told you lol 

Try this with you next meal. Top a taco or enchilada, or serve as an appetizer with tortilla chips. No matter how you eat it, it is awesome!! Let me know how you tried it and how it was! I want to know, and don't forget to come back tomorrow for the delicious Pico de Gallo recipe!

You do not want to miss it!


 HAPPY EATING!!


Wednesday, June 19, 2013

Customize your Casserole


Casseroles make easy and quick dinners, not to mention tasty! Honestly, do you want to know how casseroles were invented? Some Mom out there had no clue what to make for dinner so she threw what ever she had in a Pyrex and threw it in the oven and called it good...true story. Seriously, though its that easy. Here is an awesome chart for you to make your own custom casserole!


CHOOSE ONE INGREDIENT FROM EACH COLUMN

Protein Food
1 ½ to 2 cups
Sauce
2 cups white sauce seasoned OR 1 can condensed soup + 1/3 cup liquid
Cooked Vegetables
1 ½ cups
Cooked Pasta, etc.
1 ½ to 2 cups
Topping
2 – 4 Tablespoons
Cooked ham, slivered

Cooked or canned chicken or turkey

Cooked beef, veal, lamb or pork

Hard-cooked eggs

Frankfurters
Cheese

Canned tuna or salmon

Canned luncheon meat
Cream of celery & milk

Cream of chicken & buttermilk

Cream of potato & sour cream

Green pea & tomato juice

Cheddar cheese & vegetable juice

Tomato & water

Cream of mushroom & cream
Cooked or canned green beans

Cooked or canned peas

Cooked or canned carrots

Cooked or canned asparagus

Cooked broccoli
Noodles

Rice

Macaroni

Potatoes

Spaghetti

Corn

Sweet potatoes

Cooked Beans
Crushed potato chips

Fresh bread crumbs

Fried onion rings

Pine nuts

Potato sticks

Cracker crumbs

Slivered almonds

Crushed stuffing mix

Crushed corn flakes


EASILY SERVES 8 PEOPLE                               Bake 30 minutes @ 35


Happy Eating!!

Tuesday, June 18, 2013

Panda Express Orange Chicken Copy Cat Recipe


As I promised here is my recipe for Panda Express Orange chicken!! I have been dying to post this recipe and have finally perfected it I think!! I hope you all love it and try it. This recipe took me about 45 minutes from start to finish!! Not quite 30 minutes, sorry, but I do have some some quick 30 minute recipes coming up this week! By the way my husband LOVES  this recipe, he said it was better than Panda, I'm not quite sure about that (I am a HUGE Panda fan), but I'll let you decide!


Copy Cat Panda Express Orange Chicken

Ingredients:
  
2 lbs boneless skinless chicken, chopped into bite sized pieces
1 egg
1 1/2 teaspoons salt
pepper
oil (for frying)
1/2 cup cornstarch, plus
1/4 cup flour
1/2 tablespoon ground ginger (or fresh; ground is sometimes easier to find)
2 teaspoons garlic, minced
1/2 teaspoon crushed red pepper (I use the dried flakes; more or less depending on how spicy you want it)
1/4 cup green onion, chopped
1 tablespoon rice vinegar
Slurry
1/4 cup water
1 tablespoon cornstarch

Orange Sauce:

1 1/2 tablespoons soy sauce
4 tablespoons water
2 tablespoons sugar
3 tablespoons of brown sugar
5 tablespoons white vinegar
1 tablespoon orange juice concentrate
1 tablespoon Orange zest (optional) plus some for garnish  

Directions:

1. Place chicken pieces in large bowl. Then (in a separate bowl) stir in egg, salt, pepper and 1 tablespoon oil and mix well.

2. In a separate bowl mix cornstarch and flour together.

3. Stir flour mixture into egg mixture. Then, add chicken pieces, stirring to coat. Stir until all the chicken is coated well. Some pieces will stick together. Pull them apart so that each piece is covered well and not attached to any other pieces of chicken. This will make them easier to fry and better to eat. 

                                                photo.JPG

4. Heat oil for deep frying in a sauce pan so that you have enough oil to cover the chicken completely. I usually use about 4 inches of oil in the pan. Heat the oil to about 375 degrees or until it reacts to chicken when the chicken is put in.

Don’t let the oil smoke, the oil is too hot if the chicken browns on the outside and it isn’t cooked inside. This step take a little trial and error, you have to get a feel for the heat of the oil. You want the inside and the outside of the chicken to cook at the same rate. I recommend trying a piece when you think your oil is hot enough, when the test piece looks cooked take it out and cut it open. This will help you see if the inside and outside are cooking the same. If your oil is too low the chicken will soak up too much oil and will take a REALLY long time to cook. You should get it to the right temperature pretty quick, don’t worry, it isn’t as hard as it sounds. You will pick it up rather easily.

5. Cook small batches of chicken at a time, frying should take about 3 to 4 minutes each or until golden crisp and cooked all the way through. Try not to overcook your chicken, but just do your best! This isn’t a test! P.S. failure is the best way to learn in cooking. Remove chicken from oil with slotted spoon and drain on paper towels; set aside.


                                              photo.JPG


                                             photo.JPG

6. In a separate saucepan combine the ingredients for the orange sauce. Put this pan on the heat and bring to a boil, then remove from the heat. Set aside.

7. In a clean wok and heat 15 seconds over high heat and add 1 tablespoon of oil add garlic and green onions. Stir-fry until fragrant, about 10 seconds. Add ginger and crushed red pepper; let cook for a few seconds. Then add the rice vinegar and stir for 3 seconds. P.S. take a whiff at this point! It smells amazing and SUPER strong!


                                             photo.JPG


                                             photo.JPG


8. Add Orange Sauce and bring back to a boil. Then, add the cooked chicken, stirring until well mixed.

9. In a small bowl stir water into 1 tablespoon cornstarch until smooth and then add to chicken mixture. Stir continuously until sauce thickens. Stir orange zest if desired.

                                             
                                           photo.JPG

                                           photo.JPG 

                                           photo.JPG

TADA!!! I hope you enjoy this! It is SO yummy!!! Make it and let me know how it went! I would love to hear about some of your experiences with this dish!


Happy Eating!!


Monday, June 17, 2013

Panda Express on a Dime!!


Do you love Panda Express as much as the rest of us?!? Do you crave it, but can't afford to go out to Panda Express EVERY night?!


Well why don't you try out my version of Panda Express Orange Chicken?! 


photo.JPG

This picture was taken with my iPhone and has NO ALTERATIONS! Yup its just looks that good, and let me tell it was even prettier in person and tasted twice as good as it looks!!!!


My recipe coming this Wednesday night!! Watch for it!!!


Update: This recipe has been posted!! Check it out here


Thursday, June 13, 2013

Summer Berry Desserts!

Summer is a perfect time to cheaply have some berry desserts! Especially here in Idaho wild berries grow everywhere, but the best way to do it is to grow your own berries. You never know if your on someone's property or if herbicides have been sprayed recently. A lot of counties spray for weeds and often they can get some spray of berry bushes too.

 Here is the best way to get berries cheaply.
1. Grow them yourself! This  is a great option if you have the space to grow them. If not, don't worry.

2. Buy them from the store. Foods are always  cheaper when they are in season and berries grow in almost every environment. Check out your local ads and stores to see prices in your area.

3. Get them from friends, family, neighbors who have an excess. Often people who grow their own berries can't eat them all and will give them away to the people they know. Ask someone you know who grows berries if they have any extra, if they don't right now they probably will soon and they will know you are interested!

4. Local stands. Back home in California there were always road side stands of people selling produce they have grown themselves. Keep an eye out they usually have decent prices and don't charge tax. Here in Idaho you see a lot more peaches and other fruits for sale like this because so many people already have berries!

So...you are one of those lucky people who have tons of berries to spare (ever think about selling these to make some quick cash? or just give them away! Either way you are helping some berry-craving people out!). What to do with all those berries?!


Pie is the answer! (for now...don't worry I have more ideas for later)

Amazing Pie Crust

Yield: 2-3 shells

3 cups          All-purpose flour
1 T.              Sugar
1 t.              Salt
½ t.              Baking powder
1 T.              Nonfat Dry Milk Powder
¼ cup           Butter
¼ cup           Margarine (at least 65% oil)
1/3 cup        Lard  
1/3 cup        Shortening (not butter flavor)
½ cup           Water (may need up to 1 T. more)

Measure all dry ingredients in a medium bowl and stir well with a spoon. Measure all fats and place on top of the dry ingredients. Cut fats into the dry ingredients with a pastry blender, table knives or rub it together with your hands until it is the size of small peas. Add the ½ cup water ALL AT ONE TIME and mix together with a fork or mix lightly with your hands.

If you mix this with a mixer (not hand mixer), assemble backwards: begin with fats, add dry ingredients and water last....barely mix.

Divide dough into 2 or 3 portions (depending on how thick you want your crust). Roll out 1st portion of dough and line your pie tin with it. Roll out the 2nd portion of dough. Fold in half and cut steam slits into the fold.

Fill pie crust with filling. Brush the dough on the edge of the pie tin with water. Place the folded top crust onto the fruit filling and unfold it, making sure it goes to the edge of the pie. Seal the 2 crusts together. Brush the top with milk and sprinkle with sugar and bake.

Most fruit pies can be baked at 375 for 45 to 55 minutes.

Triple Berry Pie Filling

Yields: 1 9" pie

1 cup fresh Strawberries*
2 cups fresh raspberries*
1 1/2 cups fresh blueberries*
1/2 cup white sugar
3 tbsp cornstarch

In a large mixing bowl, stir together the sugar and cornstarch. Add the strawberries, raspberries, and blueberries; gently toss until berries are coated. Allow fruit mixture to stand for about 15 minutes. Pour the mixture into an unbaked pie crust then cover with another crust or lattice like in our picture. Bake at 375 for about 45 minutes. 

*You can use any combination of berries!


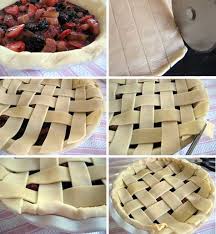
Here is a quick picture of how to do a lattice pie. I will be doing a post on this later. For more great pie tips see this post! 

Happy Eating!!


Basic Pie Making Tips

Pie Making Tips


1. Brush the edges of your pie with water just before putting the top on. This will help seal them together.

2. For a beautiful golden top, brush it with cream before baking using half and  half, evaporated milk or regular milk. Sprinkle generously with sugar.

3. Make 4 – 8 pies at a time. Bake and then freeze, placing them in gallon zip lock bags.  Once they are frozen they can be stacked on top of each other.

4. Frozen pies can be used anytime. When you have company, it is especially fun to put an uncovered frozen pie in a 350 degree oven for 35 – 40 minutes. You’ll have a nice warm pie and no mess in the kitchen.

5. Keep pie shells from shrinking by always pricking holes in it first and then do one of the following:
                        a. Bake them on the bottom of an upside down pie tin.
                        b. After lining the pie tin with dough, line it with tin foil and then pour beans,                      wheat or rice about half way. Bake it for half the baking time then lift out the foil and continue the baking.
                        c. Bake at 375 for 12 – 15 minutes.

6. Bake fruit pies at 375 for 35-45 minutes; rather than the 425 for 5   minutes and 350 for 35 – 40 minutes. This prevents the crust from getting so dark on top.

7. Bake pumpkin pies at 375 for the entire baking time. Baking time could be somewhat longer at this temperature. This will help eliminate the dark spots on the top.

8. Check for doneness of pumpkin pies with a room temperature table knife. If you are   checking more than one pie, use a different knife for each one. The knife should slide in   easily and come out clean. If the filling sticks to knife, leave it in for 2 more minutes then check it again. It finishes baking faster than you think.

9.  Pumpkin pies can be make and baked, then frozen like the fruit pies.

10. Over baking pumpkin pies will cause the filling to shrink away from the side of the pie shell.

11. Pumpkin pies should be covered and refrigerated. Some shrinkage is due to the moisture         evaporating from the filling.

12. Soggy pumpkin pie crust happens most often because of improper storage. They should be covered and refrigerated.

13. The key to nice looking and great tasting pies is practice! Practice! PRACTICE!

14.  HAVE FUN PRACTICING!!!

Happy Eating!!

Chocolate Plastic Roses

 Want to learn how to make this?! Check out my blog next week because I will be doing a post on how I made this and how you can too! These roses are great decorations and look beautiful on cakes, cupcakes or any other dessert you can think of! These are cheap, fun, and gorgeous....what more could you want?!?!


Come back next week at this time and I'll show you how you can make them yourself!! 


photo.JPG

French Boullabaisse

As many of you know I am in my last semester of college right now, i am set to graduate on July 23rd and I am so, incredibly excited!! One of my classes I am taking right now for my culinary minor is International Foods. I have been waiting to take this class since I started the program a year and a half ago.  Well now i'm finally in it and I love it!! So every week we work on one contry. We read about and we prepare food from that country and then all sit down together and enjoy it! It's awesome!! Last week we did France and it was to die for! Let me share with you one of my favorite recipes from the day. Just so you can understand how amazing this soup was I liked it more than the crepes and the creme puffs! So yeah...

First let me show you all of our food and the the beautiful place setting just to brag for a second!

photo.JPG


photo.JPG


So amazing!!! Ok now Here is the recipe. This is a simplified-more realistic version of the soup we made called Boullabisse.


photo.JPG

Boullabaisse

Serves 15 people

Ingedrients

  • 2 tablespoons olive oil
  • 2 cloves garlic, peeled and smashed
  • 1 large onion, peeled and sliced
  • 1 small fennel bulb, thinly sliced
  • 1 large pinch saffron, soaked in 2 tablespoons orange juice for 10 minutes (optional)
  • 1 strip orange zest
  • 1 (14-ounce) can whole peeled tomatoes, in juice
  • 6 cups seafood stock (sold at most fish markets) or clam juice
  • Some or all of the following seafood (ask your fish seller for enough to serve 4 to 6 people): halibut, cod, tilapiacrabmeat; clams or mussels
  • 1 bunch Italian parsley, chopped


1. Heat the olive oil in a large, heavy pot over medium-high heat. Add the garlic, onion, and fennel and saut until just brown, 5 to 10 minutes.

2. Add the saffron (if using), orange zest, tomatoes, and stock or clam juice.
       You can leave out the saffron to save money. It is very expinsive especially for a college student. It is a great addtion, but if you don't want to break the bank, leave it out.

3. Bring to a boil and cook until the vegetables are tender and the liquid is reduced by half, about 20 minutes.

4. Reduce heat to medium and add the fish (but not shellfish). Cook for about 2 minutes.

5. Add any clams, mussels, and shrimp. Simmer until the shells just begin to open, about 4 minutes more.

           You can pick and choose the type of seafood you use. The more seafood you add, the better! I really loved the different varities of seafood. Also the broth is amazing, so if you like the flovor, but you don't like the texture of seafood, you really could just strain it out!

6. Add any crabmeat.

7. Cook until all shells have opened, the shrimp is pink and curled, and the fish flakes easily, about 2 minutes.

8. Serve from the pot, sprinkled with the parsley and topped with crusty bread and a dollop of rouille.


That's it!! Pretty easy right?! The longer you let it cook at step 3, the better! Let it simmer as long as you can! Let me know how you like it! I took this recipe and made some for the hubby and he loved it! This is a good one if you really want to have something fancy!


Tuesday, June 4, 2013

Culinary Skills


How to Peel a Tomato


 The first Culinary Skill I want to teach it really simple, but I didn't realize how many people don't know how to do this! I want to make your life easier! Usually this is because you really haven't had the need for a peeled tomato, but you should! If you grow your own tomatoes it can be super cheap and easy to whip up a delicious pasta sauce or you can can them so you can have fresh tomatoes all year round. Both of these recipes plus others call for peeled tomatoes.

Have you ever thought to yourself "there is no way I am peeling a tomato! That's impossible! Skipping that part". Because I totally have! Then, when I started in the Culinary program I learned this and it has changed my life!!

Step 1: Start by putting some water on the stove to boil. Next, get a bowl of ice water ready. Make it large enough to fit all your tomatoes in at once. Wash the tomatoes. Then take them, one by one, and using a knife cut a shallow x in the bottom of the tomato. Like so...

Step 2: Once your water is boiling and you have slashed all of the bottoms of the tomatoes, place all the tomatoes into your pan of water. Let the tomatoes sit in the water for about 30 seconds. 


Step 3: Spoon out your tomatoes and place directly in the bowl of ice water (also called an ice bath). Let the tomatoes sit in the water until they have cooled. You can pull one out before it has cooled completely to test. Sometimes the tomatoes need to boil longer. 
To test: pull out one tomato out of the ice bath and try to peel the skin off with your fingers. If the skin does not immediately start to peel place that tomato back in the boiling water and try another. If the second does not peel, put all the tomatoes back into the pot of boiling water. If, however it does peel off, put in back in the ice bath and let cool. 

Step 4: Once you have tested your tomatoes and they have peeled properly and they have cooled completely you can pour out the ice bath. Take each tomato one by one and peel off the skin. They should peel off really easily and look something like this....


Finish peeling and you are done! Congrats you have successfully peeled a tomato!! Questions? Comment on this post and I will be happy to answer!

Happy Eating!!