Showing posts with label summer. Show all posts

Monday, July 1, 2013

Pico de Gallo


As I promised I have the Pico de Gallo! I know I said I would post this a few days ago, but things have been crazy! I feel like my weekends are sometimes busier than the rest of my week. I threw this dinner party Saturday, it was basically my final for my International Foods class. We had to cost out, decorate and throw an international dinner for 6 people. I chose Thailand and it was so much fun! I will have recipes and pictures for you next week and I will go more into everything I did then! Anyway I spent most of Friday and Saturday prepping for that. I did most of the cooking myself! Like I said...crazy!


So Pico de Gallo....easy peasy (spelling? I don't think I've ever written that out before haha). Here is the most simple recipe you will ever encounter!


Pico de Gallo

Ingredients:

5 jalapenos-chopped
                    seeded or not. your choice. Seeded will make it less spicy, but where's the fun in that?
3 tomatoes-chopped
1/2 white onion-diced
1/4 bunch cilantro-chopped
1-2 cloves garlic-minced
garlic salt to taste
1 lime juiced
1-3 cubes of ice
                  depending on how big your cubes of ice are. The ice is the key to enhancing the flavors. It helps bring everything out and just taste amazing!


Alright..here's the hard part....

Directions:

Add all the ingredients to a bowl and stir. Let sit for 10-20 minutes in the refrigerator. 

 AND...done. Told you it was hard! (yes, there is heavy sarcasm there). Seriously easy and seriously amazing. Try this tonight!


HAPPY EATING!!


Thursday, June 27, 2013

Yummy Summer Salsa

So yesterday in my International Foods class we headed off to Mexico! I'm telling you we had some awesome food. I made the Salsas! It was so much fun and I have now acquired two new amazing salsa recipes! These salsas are super practical and you can make them super fast (depending on how fast you chop haha for me that means it takes a little longer).

 By the way neither of these salsas are very hot (for all you with tender palates out there)! I love love super hot salsa so to put this in perspective, my husband swears they are not that hot, and I promise he is kind of wimpy when it comes to spicy foods! However, if you are like me and can take the heat ;-) these salsas are super customizable and you can make them as hot as you want them!!

My beautiful creations!


So today I am going to give you the Avocado Chile Salsa recipe and tomorrow I will post the Pico de Gallo recipe!

Avocado Chile Salsa

Ingredients:

1 whole red onion--quartered and finely sliced
2 whole red chilies--seeded and sliced or diced
1 whole lime--zested and juiced
2 whole large avocados--halved and pitted
2 large tomatoes--seeded and diced
1 large handful of cilantro leaves
TT salt and ground black pepper

Directions:

1. Put the onion, chile, and half of the lime juice into a bowl and set aside to marinate for a few minutes.

2. Using a spoon, scoop out small balls of avocado into a serving bowl. Add the lime zest and remaining juice and turn gently to coat. This will help stop the avocado from browning.

3. Add the diced tomatoes to the onion mixture, toss gently, then add the avocado mixture. Tear the cilantro over the top and sprinkle with salt and black pepper.


See! Easy! Told you lol 

Try this with you next meal. Top a taco or enchilada, or serve as an appetizer with tortilla chips. No matter how you eat it, it is awesome!! Let me know how you tried it and how it was! I want to know, and don't forget to come back tomorrow for the delicious Pico de Gallo recipe!

You do not want to miss it!


 HAPPY EATING!!


Thursday, June 13, 2013

Summer Berry Desserts!

Summer is a perfect time to cheaply have some berry desserts! Especially here in Idaho wild berries grow everywhere, but the best way to do it is to grow your own berries. You never know if your on someone's property or if herbicides have been sprayed recently. A lot of counties spray for weeds and often they can get some spray of berry bushes too.

 Here is the best way to get berries cheaply.
1. Grow them yourself! This  is a great option if you have the space to grow them. If not, don't worry.

2. Buy them from the store. Foods are always  cheaper when they are in season and berries grow in almost every environment. Check out your local ads and stores to see prices in your area.

3. Get them from friends, family, neighbors who have an excess. Often people who grow their own berries can't eat them all and will give them away to the people they know. Ask someone you know who grows berries if they have any extra, if they don't right now they probably will soon and they will know you are interested!

4. Local stands. Back home in California there were always road side stands of people selling produce they have grown themselves. Keep an eye out they usually have decent prices and don't charge tax. Here in Idaho you see a lot more peaches and other fruits for sale like this because so many people already have berries!

So...you are one of those lucky people who have tons of berries to spare (ever think about selling these to make some quick cash? or just give them away! Either way you are helping some berry-craving people out!). What to do with all those berries?!


Pie is the answer! (for now...don't worry I have more ideas for later)

Amazing Pie Crust

Yield: 2-3 shells

3 cups          All-purpose flour
1 T.              Sugar
1 t.              Salt
½ t.              Baking powder
1 T.              Nonfat Dry Milk Powder
¼ cup           Butter
¼ cup           Margarine (at least 65% oil)
1/3 cup        Lard  
1/3 cup        Shortening (not butter flavor)
½ cup           Water (may need up to 1 T. more)

Measure all dry ingredients in a medium bowl and stir well with a spoon. Measure all fats and place on top of the dry ingredients. Cut fats into the dry ingredients with a pastry blender, table knives or rub it together with your hands until it is the size of small peas. Add the ½ cup water ALL AT ONE TIME and mix together with a fork or mix lightly with your hands.

If you mix this with a mixer (not hand mixer), assemble backwards: begin with fats, add dry ingredients and water last....barely mix.

Divide dough into 2 or 3 portions (depending on how thick you want your crust). Roll out 1st portion of dough and line your pie tin with it. Roll out the 2nd portion of dough. Fold in half and cut steam slits into the fold.

Fill pie crust with filling. Brush the dough on the edge of the pie tin with water. Place the folded top crust onto the fruit filling and unfold it, making sure it goes to the edge of the pie. Seal the 2 crusts together. Brush the top with milk and sprinkle with sugar and bake.

Most fruit pies can be baked at 375 for 45 to 55 minutes.

Triple Berry Pie Filling

Yields: 1 9" pie

1 cup fresh Strawberries*
2 cups fresh raspberries*
1 1/2 cups fresh blueberries*
1/2 cup white sugar
3 tbsp cornstarch

In a large mixing bowl, stir together the sugar and cornstarch. Add the strawberries, raspberries, and blueberries; gently toss until berries are coated. Allow fruit mixture to stand for about 15 minutes. Pour the mixture into an unbaked pie crust then cover with another crust or lattice like in our picture. Bake at 375 for about 45 minutes. 

*You can use any combination of berries!
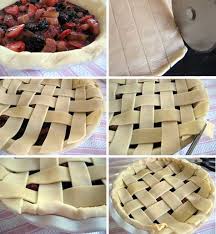


Here is a quick picture of how to do a lattice pie. I will be doing a post on this later. For more great pie tips see this post! 

Happy Eating!!